
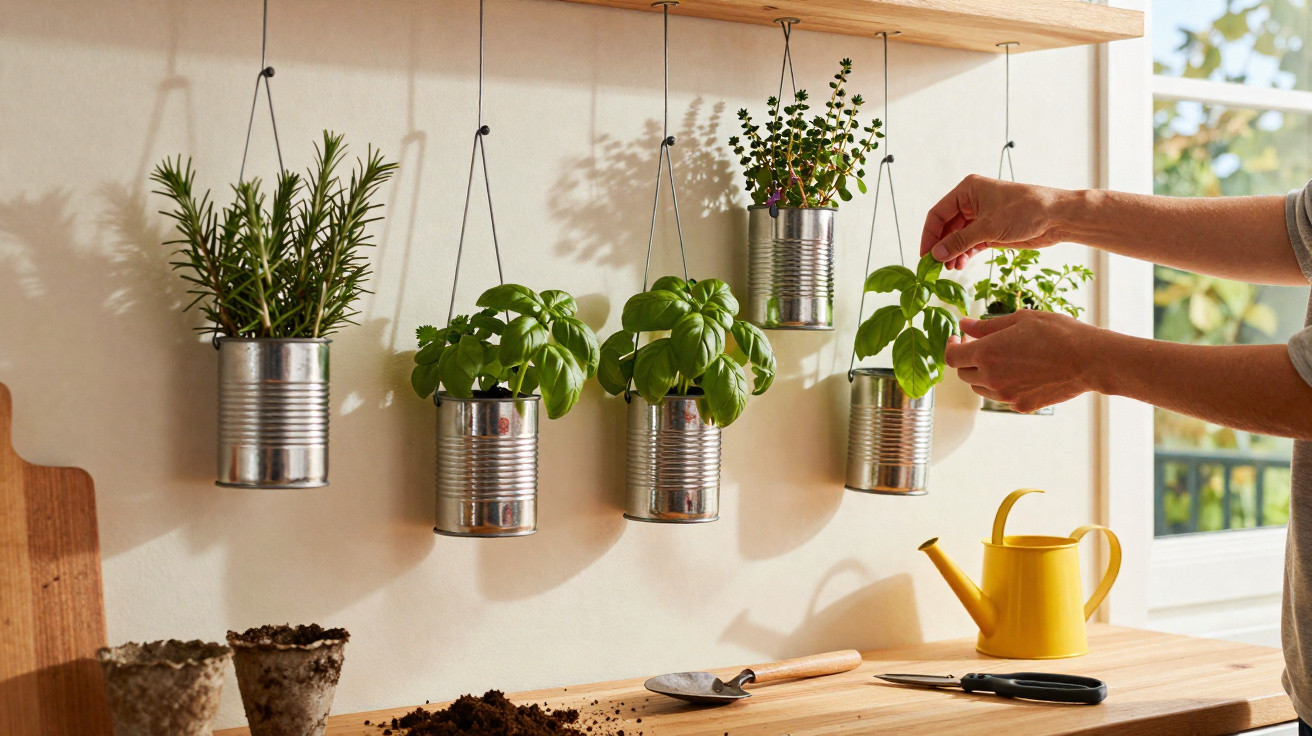
Many people clear out their kitchens and balconies in spring without giving it much thought. One everyday item nearly always ends up in the bin or recycling – entirely undeservedly. Gardeners are now keen on turning it into practical, surprisingly attractive planters for herbs.
Why empty tin cans are suddenly so sought-after
For most people, an empty tin can is simply packaging waste. Open it, remove the contents, throw the can away – that is the usual routine. Gardeners now see something different in these cans: sturdy, free plant pots that can work wonders, especially on compact balconies and patios.
With just a few simple steps, kitchen waste becomes a decorative herb pot – without having to buy new containers.
The appeal is obvious: cans are robust, stackable and easy to arrange closely together. They fit on balcony railings, steps, old fences or directly against an exterior wall – anywhere there is too little room for large planters, these slim metal containers can slot in.
Many amateur gardeners use this upcycling idea to save money and avoid plastic. Anyone already feeling the impact of rising living costs will welcome every set of plant pots they do not need to buy from a garden centre. Reusing cans also cuts down on waste, which is a benefit for anyone aiming for a more sustainable lifestyle.
This trick is particularly useful for tenants with a tiny balcony or narrow windowsill. Where there is no space for a raised bed, ten or twelve cans attached to a wooden batten can quickly create a vertical herb garden.
How tin cans become attractive herb containers
Transforming an empty can into a “rustic herb pot” is remarkably straightforward. No specialist tools or expert knowledge are required. The essential steps are always the same, although you can adapt them to suit your own taste.
Step 1: Clean and prepare the can
- Rinse out any remains of beans, sweetcorn or tomatoes thoroughly.
- Peel off the label and remove adhesive under warm water.
- If necessary, smooth sharp rim edges slightly with sandpaper.
Cleaning is not just about making the cans look good. Food residue can encourage mould or attract insects. Thoroughly clean cans provide better conditions for young plants.
Step 2: Add drainage holes for excess water
One point is crucial: plants must not be left sitting in water. Each can therefore needs small holes in its base so that excess watering can drain away.
- Make several holes in the base using a nail and hammer or a small drill.
- Place the can on a wooden board while doing this to avoid damaging the table.
- Wear protective gloves in case the metal edges bend slightly.
If you intend to hang the cans later, drill an additional small hole in the back, just below the rim. You can then thread wire or string through it.
Step 3: Make a hanger – wire loops instead of costly brackets
For a hanging effect, an old wire coat hanger or some sturdier cord is often all you need.
- Use pliers to straighten out the wire coat hanger.
- Shape two hooks that fit through the hole at the side of the can.
- The loop can then be hung from a nail, hook or trellis.
If you would rather not use a metal hanger, wrap the cans in jute twine and tie hanging knots into it instead. This gives a more country-style look while also concealing the bare metal.
Which herbs thrive particularly well in tin cans
Not every plant enjoys a confined container, but many kitchen favourites cope well with the limited space. The following varieties have proved especially suitable:
| Herb | Suitable for | Special features |
|---|---|---|
| Parsley | Soups, stews, potatoes | Likes consistent moisture and no intense midday sun |
| Chives | Salads, scrambled eggs, soft cheese | Hardy and regrows quickly after each cut |
| Thyme | Roasted vegetables, meat, Mediterranean dishes | Manages well with little water and loves sunshine |
| Mint | Tea, lemonade, desserts | Spreads vigorously – a can keeps it under control |
| Basil | Pasta, pizza, pesto | Needs plenty of light and regular watering |
Good-quality, peat-free compost is ideal. Peat-free compost protects peatland habitats while still offering good nutrient levels for container plants. One small tip: a thin layer of expanded clay or gravel in the bottom of the can further improves drainage.
Anyone planting a dozen cans side by side will have a small, fragrant “herb wall” – perfect for a balcony, fence or windowsill.
Design ideas: from industrial to brightly colourful
At first, empty cans can look rather plain. That is exactly what makes them so versatile. A few simple touches can adapt their appearance to your personal style.
Minimalist: let the metal stay metal
For a modern look, simply leave the cans unpainted. They create a striking contrast against concrete walls, black railings or wooden battens. The shiny surface combined with lush green foliage can look almost like a designer piece bought from a shop.
Bright and playful: introduce some colour
Many amateur gardeners choose weatherproof acrylic paint or spray paint. Pastel shades such as sage green, pale blue or rose work well with seat cushions and outdoor rugs. If you like, paint small designs on the cans – herb names, little sprigs or dots, for example.
- Lightly sand the cans before painting so the paint adheres better.
- Spray only outdoors or with an open window.
- Allow the paint to dry before filling them, so compost does not stick to the fresh paint.
Flowers rather than foliage: trailing plants for romantic corners
Tin cans are not only suitable for culinary herbs. Trailing flowers such as nasturtiums, trailing petunias or bacopa also do well in these metal containers. For a wilder appearance, simply sow a colourful wildflower seed mix.
Many of these flowering plants attract insects. Bees and butterflies can find food even on a small urban balcony. A few cans filled with nectar-rich plants among the herbs considerably enhance the spot’s ecological value.
What matters when watering and choosing a position
Herbs may seem easy to care for, but they can quickly become sensitive when grown in pots. In metal containers, compost heats up rapidly in strong sunshine and dries out quickly.
- Choose sunny positions that are not exposed to wind.
- During summer, water moderately in the morning and evening rather than watering too heavily once.
- Avoid waterlogging – it is better to let the compost dry slightly between watering.
- A little liquid fertiliser every few weeks supports growth.
If herbs look limp despite regular watering, check the drainage holes. They are often blocked by compost or limescale. In that case, gently tap out the can and reopen the holes.
How safe is it to grow plants in metal containers?
Many people wonder whether vegetables and herbs can really grow safely in old cans. Tin cans are generally made from tin-plated steel. Plant roots barely come into direct contact with the metal rim because the compost sits between them.
For extra reassurance, use cans with an internal coating, or insert a thin plastic liner with drainage holes drilled into it as well. This keeps the compost even further away from the metal. With ornamental plants, the issue does not present a problem in any case.
Making more of it: leftover herbs and family projects
The tin-can idea is ideal for spontaneous gardening activities with children. Give every can a name, then let the little ones plant and paint their own pots. It is a playful way for them to learn how plants grow – and that not everything has to go straight into the bin.
This miniature herb garden is also useful for rescuing supermarket leftovers: a slightly wilted bunch of parsley, a basil plant drooping in its plastic pot, or mint sprigs from the last cocktail evening. Some can be placed in water to root, then transferred to a can. This can extend their useful life considerably.
Anyone who pays close attention to their kitchen will soon realise: many households produce enough cans each week to fill an entire herb wall.
The next time you open a can while cooking, there is no need to discard it thoughtlessly. With a nail, a little compost and a small herb plant, apparent waste becomes a useful and unexpectedly decorative feature – making even the smallest balcony a little greener.





Comments
No comments yet. Be the first to comment!
Leave a Comment