
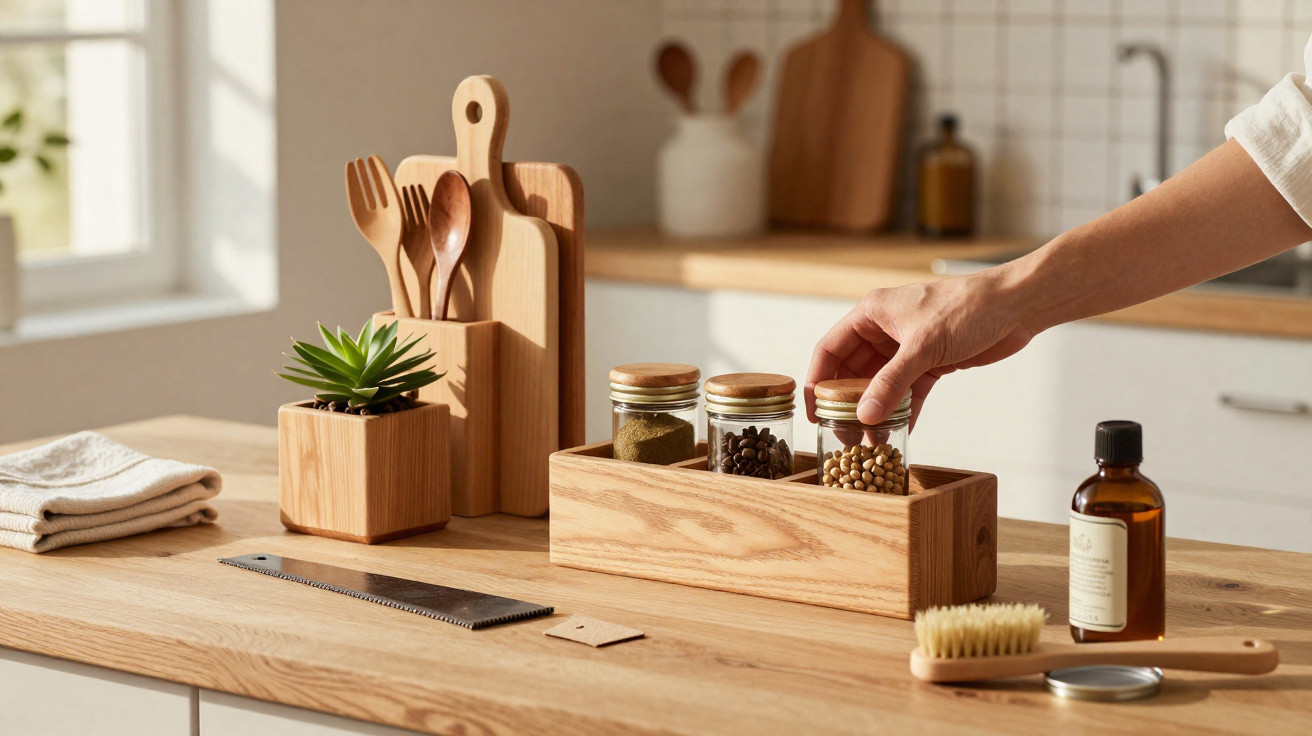
Oily bottles, coffee capsules, sticky notes – and nowhere to put them: with a few leftover boards from the cellar, a worktop can suddenly look newly organised.
Many kitchens, home offices and bathrooms do not look untidy because they lack storage, but because the available space is used poorly. At the same time, old shelving boards, pallet offcuts or pieces left from the last furniture project often pile up in the cellar. These apparently insignificant timber leftovers can make all the difference, turning a crowded surface into a structured workspace.
Why scrap wood is the ideal basis for organisation helpers
Leftover timber costs nothing, conserves resources and adds warmth to a room. Unlike plastic storage boxes, wood suits almost every interior style, from a country kitchen to an industrial loft. Anyone who has seen how a small wooden riser can make an entire surface feel “calm” will look at organising their workshop differently.
Discarded boards can become bespoke organisers tailored precisely to your own kitchen, desk or vanity top.
Scrap wood brings another benefit: there is no need to worry excessively about incorrect cuts. That takes the pressure out of the project and makes getting started with DIY easier, even for beginners with little experience.
Choosing and preparing the right wood
Not every salvaged piece is suitable for every room. If food or moisture is involved, it is worth inspecting the material more closely.
Suitable wood types for kitchen and bathroom projects
- Clean offcuts from solid-wood furniture
- Undamaged plywood or birch multiplex pieces
- Dry leftover floorboards or parquet
- Pallet boards without major cracks or questionable coatings
Avoid pressure-treated timber, strongly scented boards previously used outdoors, and pieces with flaking old paint if the finished item will be used in a kitchen or bathroom. Hygiene and peace of mind matter here.
The basic process is nearly always the same: brush the wood thoroughly, allow it to dry completely, sand it first with a medium grit and then smooth it with a fine grit. This can transform a grey-looking board into an attractive piece of timber again.
Protecting the surface: varnish, oil or paint?
Moisture always has a part to play in kitchens and bathrooms. A hard-wearing seal helps prevent staining and swelling.
- Acrylic paint with a clear top coat: easy to wipe clean and available in a wide range of colours
- Hardwax oil: brings out the grain, looks more natural and needs refreshing over time
- Clear polyurethane varnish: suitable for heavily used surfaces or splash-prone areas
If in doubt, try the finish on a small offcut first. This shows how much the colour will darken and whether the surface feels sufficiently smooth.
14 clever projects that free up every worktop
The principle behind every project is simple: group items into “families”, build upwards and assign them to clearly defined zones. The surface stays clear while everything remains within easy reach.
- Raised bottle stand for oil, vinegar and sauces – a narrow board on feet positioned against the back wall.
- Carry box for cooking utensils with a handle, holding wooden spoons, whisks and spatulas.
- Slim spice rail mounted on the wall or along the rear edge of the worktop.
- Vertical chopping-board holder so boards can dry upright without taking up space.
- Capsule or coffee pod organiser beside the coffee machine, cut precisely to suit your preferred brand.
- Box for coffee filters and napkins to bring order to the breakfast area.
- Small tray for hand soap and washing-up liquid beside the sink, raised slightly so nothing sits in water.
- Pen and note holder for the home office, with room for paper clips and USB sticks too.
- Monitor riser with a compartment for a keyboard and notebook – more ergonomic and tidier.
- Charging station for a smartphone and tablet with routed cable channels.
- Wall compartment for post and bills in the hallway or above the desk.
- Tray for toiletries in the bathroom, keeping creams and bottles together.
- Wooden dish for keys and small items placed directly by the front door.
- Small book crate for favourite books or cookbooks on a sideboard or worktop.
Anyone who divides their surface into functional islands – a coffee zone, cooking zone and washing-up area – will see scattered items suddenly become structured.
Tailoring every project to the room and daily routine
Before reaching for the saw, it pays to get out the tape measure. How deep is the worktop really? How much clearance is there beneath the wall cupboard? Is the monitor higher than expected? Knowing these dimensions avoids having to cut things down later.
A quick pencil sketch is useful for planning compartments, drill holes and handles. With a charging station in particular, it matters where cables exit the wood and whether the plug will fit through.
Simple construction, even without a professional workshop
Most of the 14 ideas use only a few straight boards. In many cases, little more than a handsaw, cordless drill-driver, glue and a few screws is required. Anyone with very limited tools can have timber cut to size at a DIY shop.
- Glue the surfaces together, clamp them in place, then secure them with screws
- Soften edges with sandpaper to prevent splintering
- Drill holes for finger pulls or cables before applying varnish
With each project, confidence grows, and soon every strip of wood in the cellar becomes a possible answer to a small everyday problem.
How wooden organisers change the feel of a home
Organisation systems made from scrap wood do more than improve appearances: they structure routines. Starting the morning in an orderly kitchen means coffee capsules and a favourite mug can be found without looking. Tidy desks also make home-office work easier, as piles are no longer constantly in view.
Wood feels warmer than metal or plastic. In particular, a few oiled boards on the worktop can bring some comfort back to cool new-build kitchens. Small details – recessed handles, chamfered edges or a strip of colour – ensure the organisers look like deliberately chosen accessories rather than temporary solutions.
A sustainable side benefit and useful additions
Using leftover wood saves both money and waste. Retired shelving boards remain in circulation instead of ending up as bulky waste. This not only protects resources, but is simply enjoyable because every organiser carries a small story: “This used to be our old bookcase”.
Those who enjoy these projects can take them a step further by planning combinations: a continuous wooden ledge running from the spice area to the oil shelf; a hallway set comprising a key tray, post compartment and coat rail in the same style. Even simple hook rails or magnetic knife boards made from scrap wood complete the look and make use of every nook.
One thing remains important for every project: secure screw fixings, neatly sanded edges and a finish that is easy to clean. Then these handmade organisation helpers can last for many years – and worktops can finally serve their intended purpose: providing space for cooking, working, crafting and living.





Comments
No comments yet. Be the first to comment!
Leave a Comment