
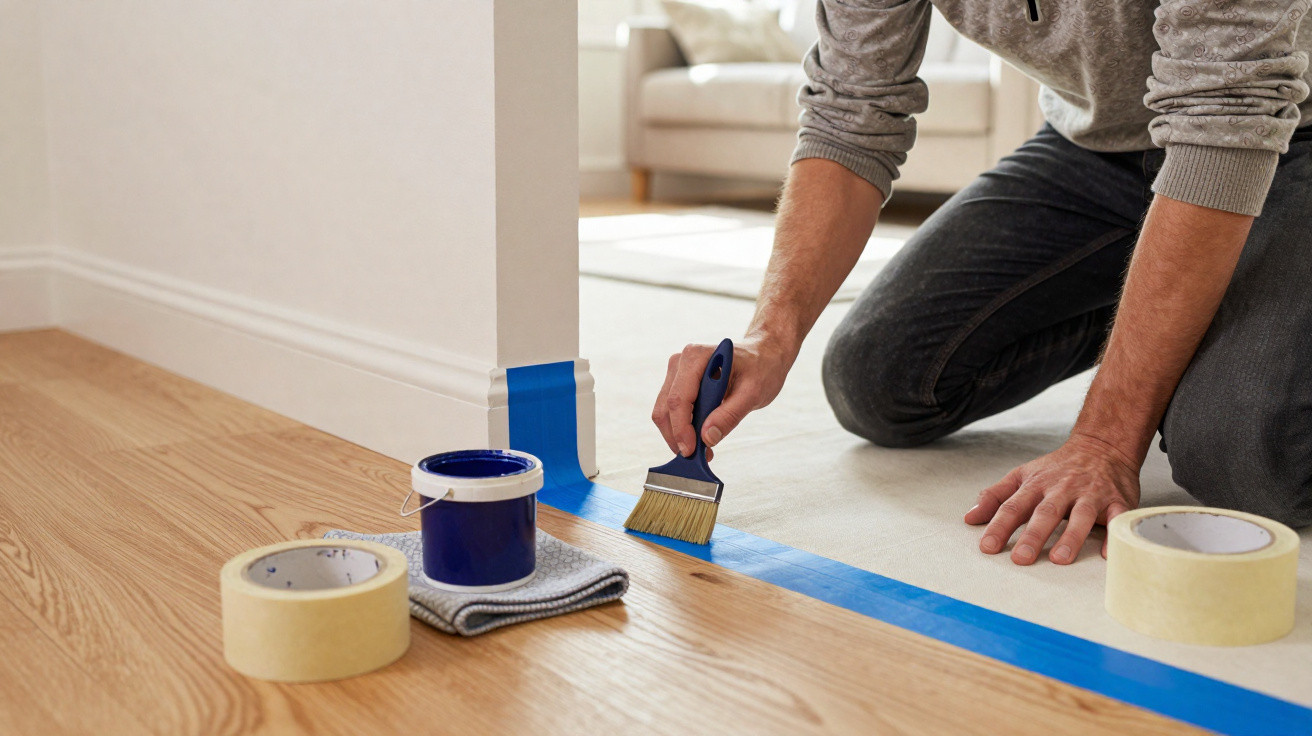
That narrow length of timber at floor level seldom gets much attention, but it outlines every room and subtly influences its character. Once it becomes yellowed, chipped or marked, the entire room can seem less polished. Plenty of homeowners put off repainting skirting boards because they worry about splashing the floor, dust spoiling the paint or spending hours in an uncomfortable position. However, a smart, fuss-free approach has become popular with DIY enthusiasts, allowing you to repaint skirting boards in place without damaging the flooring.
Why skirting boards need a proper refresh
Interior designers regularly make the same point: newly painted walls paired with worn skirting boards create a slight yet persistent impression that the room has been neglected. You may not identify the reason immediately, but your eye notices it. In older rented properties and busy family homes, skirting boards commonly endure the most punishment from vacuum cleaners, toys, mops, footwear and pet bowls.
A quick refresh on skirting boards can lift a room almost as much as repainting an entire wall, for a fraction of the budget.
There is a practical benefit too: paint on skirting boards helps shield the bottom of the wall from knocks and moisture. The difficult part is painting so close to the floor while maintaining a clean edge and avoiding runs. This “secret” method, familiar to many decorators but not widely discussed, is designed for exactly that.
First rule: protect the floor like a crime scene
Decorators do not begin by opening the paint tin; they begin by covering the surrounding area. A perfectly neat skirting-board edge counts for little if the carpet or wooden floor ends up dotted with tiny white specks for years.
Protecting each type of flooring
The basic approach suits nearly every floor finish, although the protection required varies slightly:
- Hardwood, laminate, tiles: use painter’s tape with a slim strip of protective paper or cardboard.
- Vinyl floors: choose low-tack painter’s tape so the finish is not lifted.
- Thin carpet: press tape lightly into the pile, using a broad filling knife where needed to tuck in the edge.
- Thick carpet: where possible, slide a piece of rigid plastic or a laminate offcut beneath the skirting-board edge.
In every case, the aim is to form a close-fitting barrier where the wall meets the floor. Position the tape only a few millimetres from the skirting board: this leaves room to paint while stopping the smallest splashes.
Painter’s tape: the understated essential
Masking tapes do not all perform equally. Low-cost tapes may allow paint to seep underneath, while others rip or leave adhesive behind. Decorators commonly choose medium-tack painter’s tape measuring around 38–50 mm wide. This gives useful coverage if your hand slips or you need to set the brush down briefly.
Press the tape firmly along the edge with a fingertip or a plastic scraper so no tiny pockets of air remain where paint can sneak in.
Removing the tape at the right point matters as well. It must remain in position long enough to guard the edge, but it should be taken off before the paint fully dries into a brittle layer across it. Professionals often peel it away once the final area has been painted and begun to set, generally after 15 to 45 minutes depending on the product.
Dust and grease: hidden threats to a smooth finish
Anyone who has painted skirting boards before cleaning them will recognise the result: small raised marks develop as dust and fibres become embedded in the drying paint. Grease or old wax can also stop paint adhering properly, causing the finish to peel.
A simple cleaning routine that protects the finish
There is no need for heavy-duty industrial products. Before you open the tin, a practical preparation routine is usually:
- Vacuum along the skirting boards to pick up hair and crumbs.
- Wipe the surface with a lightly damp microfibre cloth to remove fine dust.
- Clean grooved, decorative or profiled boards with a soft brush.
- Allow every surface to dry fully, preventing the fresh coat from trapping moisture.
Behind radiators and sofas, dust can accumulate alongside old cobwebs. Giving these spots one extra minute prevents noticeable flaws in areas where low winter sunlight is most revealing.
Degreasing busy hallway and kitchen areas
By the front door, skirting boards often collect shoe polish and dirt brought in from outside. Kitchen skirting boards can develop a light greasy coating, even when they are nowhere near the hob. Mild degreaser, diluted washing-up liquid or soap is suitable. Rinse afterwards with clean water, then use another cloth to dry the surface so that no residue is left behind.
For glossy or previously varnished boards, a very light sanding with fine abrasive pads or extra‑fine steel wool helps the new layer bond and level.
This sanding is intended only to take away the sheen, not to cut into the timber. Afterwards, vacuum once more to ensure fresh sanding dust does not settle into the newly applied paint.
The “secret” tool: a cutting-in brush for sharp, controlled lines
Although many DIY painters automatically choose a small roller or flat brush, decorators frequently use a pointed cutting-in brush made for corners and close edges. At first, it appears simple: bristles taper gently to a point, paired with a round or oval ferrule and a comfortable short handle.
Why a cutting-in brush makes such a difference
Its profile enables you to guide the tip directly beside the skirting-board edge without filling the joint with paint. The action is more like drawing with a marker pen than brushing with a broad tool. After a little practice, a cutting-in brush can greatly reduce the need for extensive masking, although most people still use tape as added protection.
The key is the amount of paint on the brush. Rather than immersing the complete brush head, decorators typically dip only the first third of the bristles before lightly pressing them against the tin’s side or a grid to remove surplus paint. The bristles should hold colour without dripping.
A lightly loaded cutting‑in brush gives more control, fewer runs and a cleaner edge than a soaked roller fighting gravity.
Selecting suitable paint for skirting boards
Skirting boards face more wear than most painted walls. Since they are regularly cleaned and scuffed, ordinary wall emulsion is seldom durable enough. Professionals generally select paints labelled for woodwork or trim, in either water-based or solvent-based formulations.
| Type of paint | Strengths | Points to watch |
|---|---|---|
| Water-based (acrylic) | Low odour, fast drying and simple water clean-up. | May require an additional coat over glossy finishes or dark colours. |
| Solvent-based (oil / alkyd) | Creates a hard-wearing film, levels smoothly and suits high-traffic areas. | Has a stronger odour, takes longer to dry and needs white spirit or similar for cleaning. |
Satin or semi-gloss paint generally provides the most effective compromise: it has a smart appearance, catches enough light and can be wiped regularly without showing marks straight away. If the timber is previously stained or dark, use a dedicated primer to stop stains bleeding through.
The painting process: short, steady strokes in one direction
The working sequence is usually consistent. Begin with the highest and most noticeable lengths, then progress around the room at an even pace. Kneepads or a folded towel protect your joints and make you less likely to hurry through the final metre.
How decorators paint each section
Professionals often divide the job into practical lengths of 60 to 80 cm:
- Cut in along the upper edge using the pointed brush, working immediately beneath the wall line.
- Cover the board’s central area with several horizontal strokes.
- Complete the section by gently “pulling” the paint in a single direction, often from one end to the other.
That last stroke aligns brush marks and makes the paint thickness more uniform. Brushing repeatedly in different directions is more likely to create ridges and obvious stopping points.
Keeping the brush moving in one consistent direction helps the eye read the surface as smooth, even when the underlying wood carries small defects.
At corners where two skirting boards join, the cutting-in brush is particularly useful. Fully paint one board, allow it to set, and then paint the second so that the overlap remains crisp rather than untidy.
Common mistakes when repainting skirting boards
Decorators encounter the same problems in flat after flat. These issues are seldom caused by a lack of ability; impatience and skipped preparation are usually responsible.
What commonly goes wrong
- Failing to remove dust, which creates bumps or small craters in the painted surface.
- Not degreasing, particularly in hallways and kitchens, which can lead to peeling later on.
- Applying wall emulsion rather than trim paint, leaving scuffs and marks within a few weeks.
- Loading too much paint onto the brush, producing runs and thick edges that dry slowly.
- Pulling off tape well after the paint has cured, which tears the fresh film along the edge.
Once the paint has hardened, fixing these errors commonly means sanding back parts of the surface and beginning again. That takes considerably longer than proper preparation would have done.
Making a small chore into a winter upgrade project
Repainting skirting boards suits the quieter seasonal period when rugs are turned and curtains are washed. As the surface area is limited, material costs are modest, especially in comparison with renovating a whole room.
Colour preferences have shifted too. Rather than choosing conventional white, some homeowners now opt for:
- Soft greys that outline pale walls in contemporary flats.
- Deep navy or charcoal against neutral walls to create a graphic base line.
- Subdued greens or clay shades in older homes, reflecting period details.
These choices demonstrate how a modest architectural feature can shape the feel of a room. In households with pets or children, darker skirting boards may disguise day-to-day scuffs, while satin paint remains easy to wipe with a damp cloth.
Going further: repainting doors, frames and window sills too
Once the skirting boards are freshly painted, other woodwork can look worn by contrast. Window sills, internal doors and door frames often have the same original paint finish. Refreshing them during the same project creates a more consistent look and can improve the perceived standard of a rental property or a home being prepared for sale.
If you already have the tape, brushes and paint out, upgrading the rest of the trim usually only adds a few extra hours but transforms the space.
For anyone considering future flooring work or energy improvements, repainting skirting boards is also an opportunity to check for gaps where draughts enter or moisture could affect the plaster. Repairing and sealing such minor faults before painting helps avoid future damage to the fresh finish and makes the home more comfortable in colder weather.





Comments
No comments yet. Be the first to comment!
Leave a Comment