
Anyone planting Sedum in a pot or bed often fails not because of frost, but because of waterlogged roots – and that is exactly where a surprising kitchen trick can help.
Many amateur gardeners are surprised when their otherwise tough stonecrops suddenly turn yellow, become mushy and die. Usually, a fungus is not to blame; instead, the issue is a simple mistake at the base of the planting hole. Rather than carrying home expensive expanded clay pellets, you can use an inconspicuous kitchen leftover that would otherwise go in the bin – with a noticeable benefit for plant health and growth.
Why Sedum often dies in pots despite being robust
Sedum – commonly known as stonecrop or orpine – is considered almost indestructible. These plants cope with heat, are hardly ever damaged by frost and even grow in poor soils. The real issue lies further down: water sitting around the roots.
In pots and garden beds alike, the following can happen quickly: repeated watering compacts the soil. The pores in the growing medium close, water can no longer drain away, and the pot or planting hole turns into a small basin. The roots remain wet, start to rot, and the plant suddenly collapses.
“With Sedum, the bottom of the planting hole decides between life and death – not the fertiliser applied in spring.”
Many people then react instinctively: head to the garden centre and buy expanded clay or gravel. It works, but it makes containers heavy, costs money and is simply impractical for small balconies. This is where a kitchen waste product comes in, delivering the same effect while being remarkably light and free.
The secret kitchen ingredient for perfect drainage
Germany’s environmental authority has encouraged the direct use of organic waste in gardens for years. For Sedum, these leftovers can be used far more cleverly than simply adding them to the compost heap. Hard shells and stones are particularly suitable.
These include:
- walnut shells
- hazelnut shells
- almond shells
- shells from unsalted pistachios
- crushed stone-fruit stones, such as peach, apricot or cherry stones
- coarsely broken eggshells
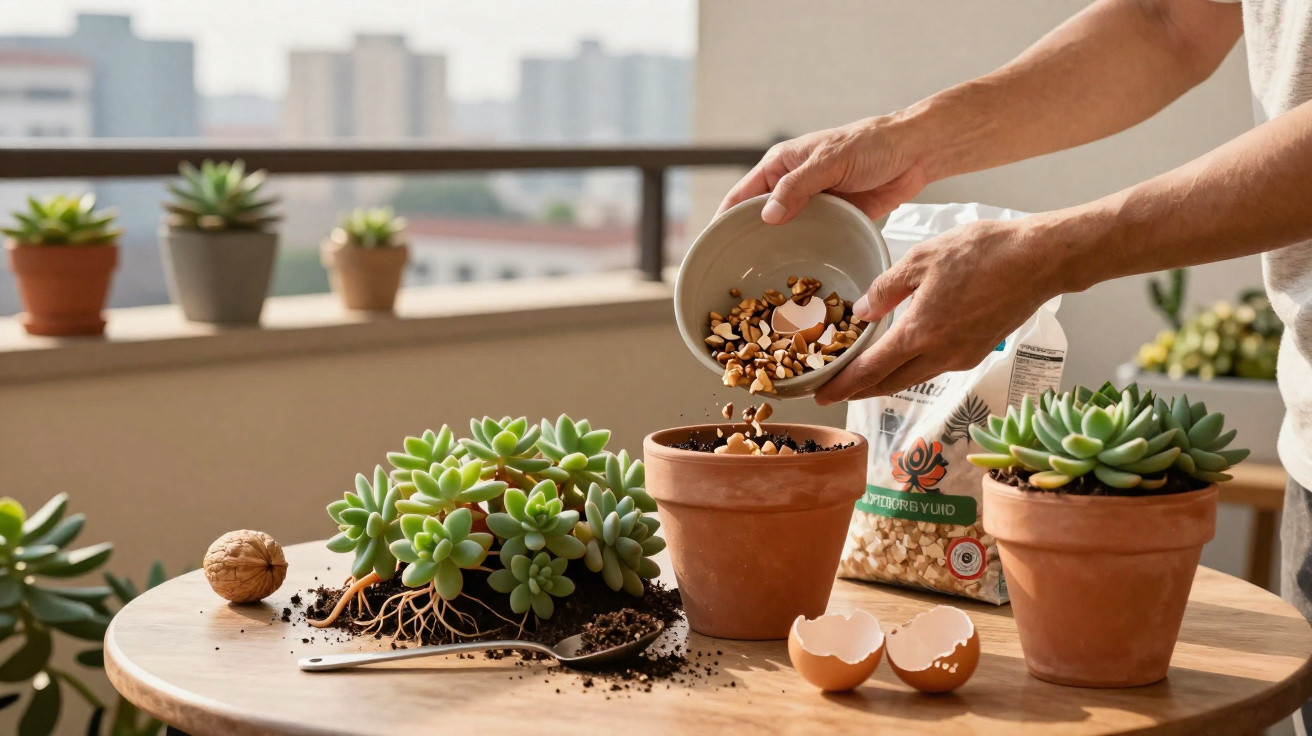
These remnants would normally end up in household waste or the food-waste bin. In a garden or window box, however, they can do much more: placed at the bottom of the planting hole in a loose layer around three to five centimetres thick, they allow watering and rainwater to drain away very quickly.
“Kitchen waste becomes a long-lasting drainage layer that protects Sedum for two to three years.”
The key point is that nut shells and eggshells decay extremely slowly. Their mechanical benefit therefore remains in place over the long term. Even after several seasons, they still act as a drainage framework and stop the soil at the base from becoming fully compacted.
How to prepare nut shells and eggshells correctly
Preparation takes only a few minutes and requires no specialist tools. The important thing is to create coarse pieces rather than a fine, crumbly material.
Step-by-step instructions
- Allow collected nut shells, stones and eggshells to dry thoroughly.
- Put them into an old fabric bag or a sturdy hessian sack.
- Strike the bag firmly several times with a hammer or a heavy wooden block.
- Break the shells only roughly – do not turn them into powder; pieces can remain one to three centimetres in size.
- For eggshells, curved pieces of around one to two centimetres that retain their shell shape are ideal.
These curved pieces of eggshell create small cavities. They keep air at the bottom of the pot and produce a particularly loose structure. The difference is immediately apparent in window boxes: water drains more quickly and the soil settles less.
How to create the Sedum drainage layer properly
The principle is a straightforward, consistent arrangement, whether you are using a pot, window box or a light garden bed.
| Layer | Material | Guide amount |
|---|---|---|
| Bottom layer | crushed nut shells, eggshells and stones | 3–5 cm |
| Middle layer | sandy, loose soil | thin, approx. 1–2 cm |
| Top layer | growing medium for Sedum, preferably poor and mineral-rich | remaining pot depth |
First, cover the base of the planting hole or pot with the coarse shell mixture. Add a thin layer of sandy soil afterwards. Only then should you place the Sedum plant. This means the root ball never sits directly on the coarse material, but instead rests in a transition layer that passes water onwards without allowing it to collect.
“The aim is not to fertilise, but to make the soil free-draining. The shells primarily provide a route for water, not a nutrient boost.”
Is this really enough, or do you still need expanded clay?
Many gardeners have relied on expanded clay pellets or gravel for years. These materials work well, are durable and remain stable for a long time. For standard window boxes and smaller pots containing Sedum, however, they are usually unnecessary once a good shell layer is in place.
Three rules make this method successful:
- use only unsalted shells, never roasted and salted snack shells
- always crush them coarsely so that cavities remain
- consistently add sandy, very loose growing medium above them
If you prefer, you can use a combination in large containers: a light layer of shells at the bottom, topped with smaller amounts of expanded clay. In everyday use, though, the kitchen-waste option alone is usually entirely sufficient for Sedum. The difference becomes clear at the latest when the first plant has spent several years in its pot without rotting.
Especially useful for city balconies without a car
One benefit that is often overlooked is weight. Carrying heavy bags of gravel or expanded clay up to a fourth-floor flat puts many city residents off. Nut shells weigh almost nothing, fit into a small bag and are produced in the household anyway.
Tenants without a car benefit in particular: no heavy lifting, no trips to the garden centre, yet healthy Sedum plants in window boxes and pots. Anyone who regularly eats nuts or cooks egg dishes can easily collect a bucket of drainage material over one winter – free of charge.
How long does shell drainage last, and when should it be renewed?
Hard nut and egg remnants break down only very slowly. Depending on location, moisture and temperature, they remain effective in the soil for roughly two to three years. Gradually, they crumble into smaller fragments, the pores slowly close and drainage performance declines.
A good time to top it up is:
- when you are repotting anyway
- when Sedum suddenly starts growing noticeably less well
- when water runs significantly more slowly from the drainage holes
When repotting, it is enough to replace the lowest layer and add fresh shells. You can spread the old soil over garden beds, where it will continue to improve the soil.
What happens in the soil in detail
The shell fragments create large cavities, known as macropores. Waterlogging does not gather in these spaces; air does. The soil cannot compact as severely because the hard pieces act as a framework. Water quickly finds its way down through the many gaps and escapes through the drainage hole.
At the same time, the organic remnants release carbon and minerals very slowly. This happens gently enough for the character of the growing medium to remain stable. That is ideal for Sedum, as these plants do not need nutrient-rich soil; above all, they need drainage and some structure.
Further tips for permanently healthy Sedum plants
Drainage is the most important component, but it is not the only consideration when caring for Sedum. Three simple adjustments are often enough to help the plants thrive for many years:
- Growing medium: choose a poor, mineral-rich mix; for example, combine potting compost with sand, grit or fine gravel.
- Watering: water less often but thoroughly, and allow the soil to dry out noticeably between waterings.
- Position: choose as sunny a spot as possible and avoid having a rain cover directly overhead, so water cannot build up.
Combining these measures with shell drainage creates the conditions stonecrops naturally favour: few nutrients, no waterlogging and plenty of light. Pots, wall crevices and window boxes can then gradually become long-lasting, low-maintenance mini steppes – without heavy bags, without a special budget and with a simple trick from your own kitchen.


Comments
No comments yet. Be the first to comment!
Leave a Comment